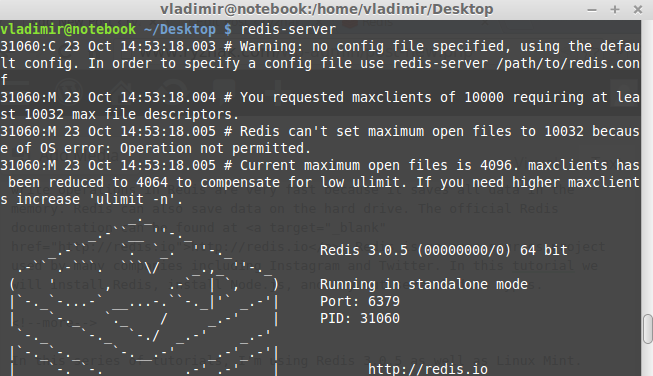
Redis (REmote DIctionary Server) is an advanced key-value data store. Read and write operations in Redis are very fast because it saves all data in the memory. Redis can also save data on the hard drive. The official Redis documentation can be found at http://redis.io. Redis is an open sources project used by many companies including Instagram and Twitter. In this tutorial, we will install Redis, install Node.js, and try out several data types.
In this series of tutorials, I’m using Redis 3.0.5 as well as Linux Mint.
To install Redis you should:
1. Download the latest stable release from http://redis.io/download
2. Unpack it
3. Run sudo make install
4. After the installation is finished, run make test to check whether everything is working correctly
There are several executable commands in Redis:
– redis-cli: command-line interface for Redis(client part)
– redis-server: Redis data store.
By default, Redis binds to port 6379. Run redis-server in your terminal.
You can run the Redis client via redis-cli.
SET: creates a key with a string value
GET: reads the key value

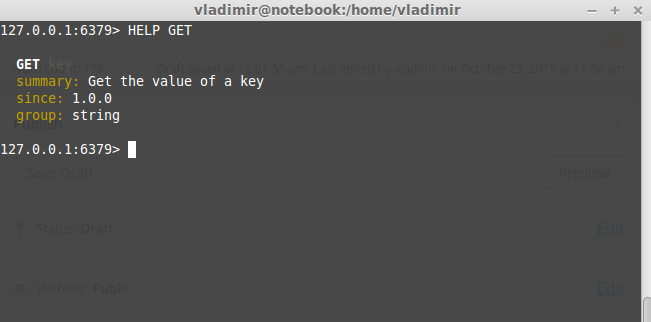
The HELP command is useful for learning about syntax.
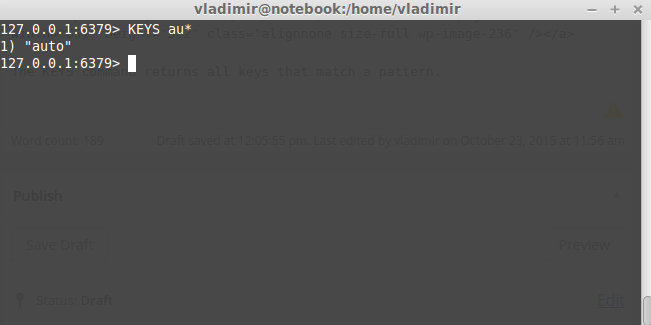
The KEYS command returns all keys that match a pattern.
Now it’s time to install Node.js. You can download it at https://nodejs.org/en/download/.
Then create a separate folder for this tutorial, for example tutorial1. Run npm install redis inside this folder. This will install the redis module for Node.js.
Now let’s create a classic “Hello World” example. Create a file called helloworld.js with the following code:
|
1 2 3 4 5 6 7 8 9 |
//require the redis library in Node.js var redis = require("redis"); //creating the redis client object var client = redis.createClient(); //SET command. Saving a string "Hello world" in a key "key" client.set("key", "Hello world"); //GET command. Getting the value stored in "key" adn output it client.get("key", redis.print); client.quit(); |
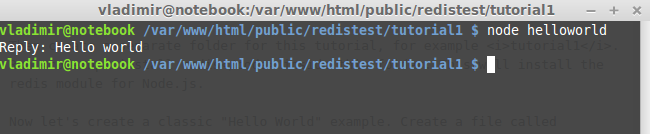
Now run node helloworld. You should see the following:
Redis data types
Different Redis data types are used to solve different issues.
String data type can store any data: text, binary, integers. A String can not exceed 512MB.
String use cases:
– counting. You can store numbers like page views or video views. To increment or decrement values, you can use INCR, INCRBY, DECR, DECRBY, and INCRFLOATBY commands.
– cache. You can cache binary or text data. It can be implemented using SET, GET, MSET, MGET commands. Strings have an automatic key expiration through the SETEX, EXPIRE, and EXPIREAT commands.
MSET: sets the values of multiple keys at once.
MGET: returns the values of multiple keys at once.

EXPIRE: adds an expiration time in seconds to a given key. After that time, the is automatically deleted. It returns 1 (expiration is set successfully) or 0 (the key does not exist or cannot be set).
TTL(Time To Live): returns an integer(seconds a given key has left to live). It can also return -2 (the key is expired or does not exist) or -1(the key exists but no expiration time set).

INCR: increments a key by 1 and returns the value
INCRBY: increments a key by a given number and returns the value
DECR: decrements a key by 1 and returns the value
DECRBY: decrements a key by a given number and returns the value
INCRBYFLOAT: increments a key by a given float number and returns the value
INCRBY, DECRBY, and INCRBYFLAOT can accept positive or negative numbers.

Notice that the above commands are atomic(2 different clients can not execute the same command at the same time). Redis is single threaded. It always executes one command at a time.
Let’s create a String example. We will create an application with a set of functions used to like and dislike photos. Add 3 examples:
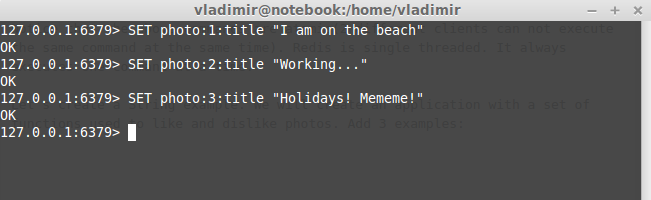
Notice the key structure: photo:[ID]:title. In this key we store our photo title. In the second key photo:[ID]:likes we will store the number of likes. The following example explains better.
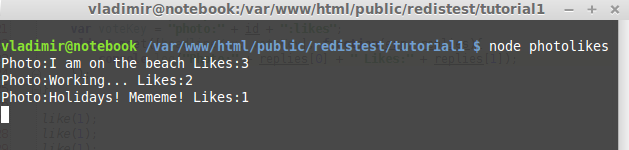
There will be 3 functions in our code, the first increments the number of likes by 1, the seconds decrements the number of likes by 1, and the third displays the results. Create a file photolikes.js with the following code:
|
1 2 3 4 5 6 7 8 9 10 11 12 13 14 15 16 17 18 19 20 21 22 23 24 25 26 27 28 29 30 31 32 33 34 35 36 37 |
var redis = require("redis"); var client = redis.createClient(); //creating a like function, that has a photo ID as the argument function like(id){ //defining our key, ex: "photo:1:likes" var key = "photo:" + id + ":likes"; //use the INCR command to increment the number of likes by 1 client.incr(key); } //same as like function, but decrements by 1 function dislike(id){ var key = "photo:" + id + ":likes"; client.decr(key); } //showing the photo title and the number of likes function showResults(id){ var headlineKey = "photo:" + id + ":title"; var voteKey = "photo:" + id + ":likes"; client.mget([headlineKey, voteKey], function(err, replies){ console.log("Photo:" + replies[0] + " Likes:" + replies[1]); }); } like(1); like(1); like(1); like(1); dislike(1); like(2); like(2); like(3); showResults(1); showResults(2); showResults(3); |
Notice that all Redis commands have an optional callback function for errors and replies from the Redis server. We are using one of this callback in the mget function.
Now run node photolikes. You should see the following output:
The next data type we are going to take up is Lists. This data type acts like a simple collection, stack, or queue. List commands are atomic. There are blocking commands in Redis’s Lists. It means that when a client executes a command in an empty List, the client will wait for a new item to be added in the List. Redis’s Lists are linked lists. A single List can hold more that 4 billion elements.
List use cases:
– storing most recent posts. As Twitter does.
– event queue
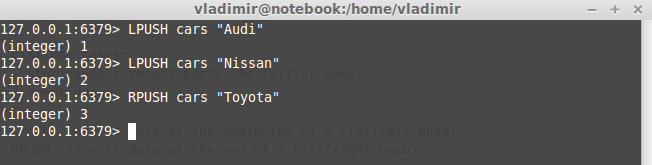
LPUSH: inserts data at the beginning of a List(left push)
RPUSH: inserts data at the end of a List(right push)
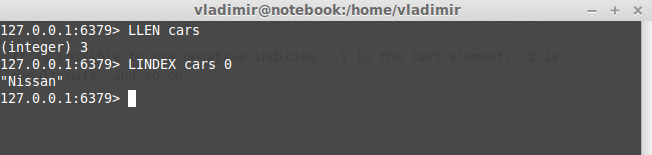
LLEN: returns the length of a List
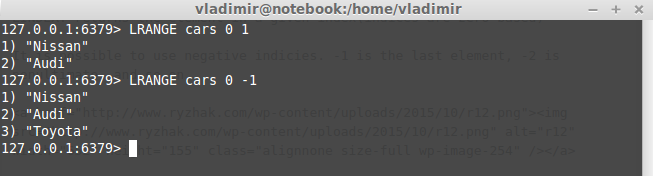
LINDEX: returns the element in a given index(indices are zero-based)
It is possible to use negative indicies. -1 is the last element, -2 is penultimate, and so on.
LRANGE: returns an array with all elements from a given index range(including the start and the end indicies).
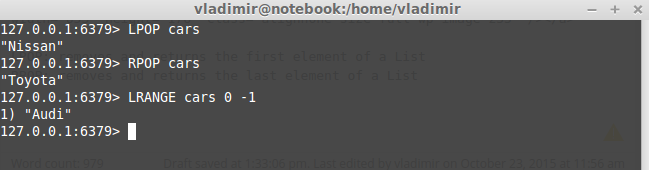
LPOP: removes and returns the first element of a List
RPOP: removes and returns the last element of a List
Now let’s implement a simple log queue system. Items there are inserted at the front of the queue and removed from the end(FIFO – First In, First Out). Create a file called logqueue.js with the following code:
|
1 2 3 4 5 6 7 8 9 10 11 12 13 14 15 16 17 18 19 20 21 22 23 24 25 26 27 28 29 30 31 32 33 34 35 36 |
//this function receives a queue name a the redis object as parameters function LogQueue(queueName, redisClient){ //save queueName as a property this.queueName = queueName; //save redisClient as a property this.redisClient = redisClient; //set the property queueKey to the proper redis key name this.queueKey = "queues:" + queueName; //no timeout this.timeout = 0; } LogQueue.prototype.size = function(callback){ //execute the LLEN command on the queue key name and pass callback as an argument this.redisClient.llen(this.queueKey, callback); }; //push an element to the list LogQueue.prototype.push = function(data){ //execute the LPUSH command by passing the queue key name and data argument this.redisClient.lpush(this.queueKey, data); }; //pop an element from the end LogQueue.prototype.pop = function(callback){ //execute the BRPOP command //passing the queue key name, timeout, and the callback //BRPOP removes the last element from the List. If the List is empty, it //waits until there is something to remove. //If we used RPOP here we would implement some kind of polling by ourselves this.redisClient.brpop(this.queueKey, this.timeout, callback); } //Node.js export, we will be able to access this object via require("./logqueue") exports.LogQueue = LogQueue; |
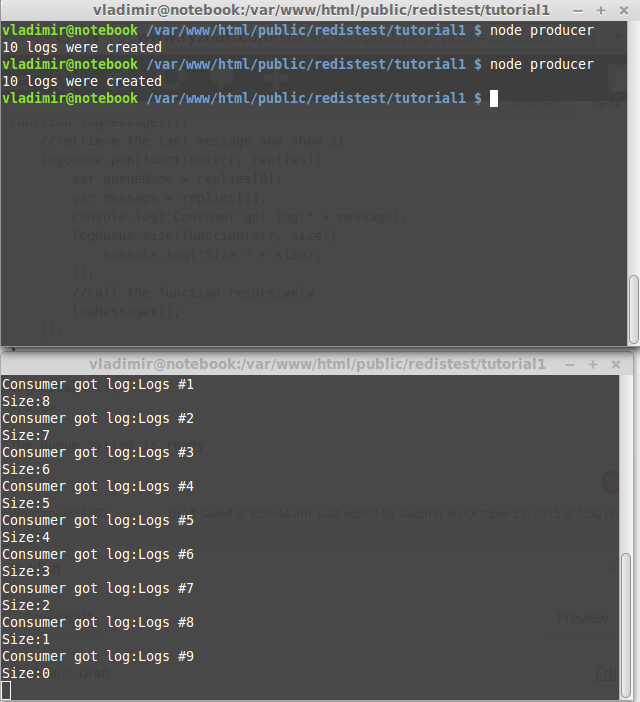
The producer pushes messages into the “logs” queue. The consumer then pops messages in another terminal window.
Create a file producer.js, which is going to add logs to a queue:
|
1 2 3 4 5 6 7 8 9 10 11 12 13 |
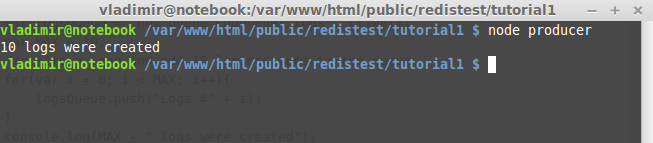
var redis = require("redis"); var client = redis.createClient(); //require thr module logQueue, which we created in the logqueue.js file var queue = require("./logqueue"); //create an instance of the function defined in the logqueue.js var logsQueue = new queue.LogQueue("logs", client); var MAX = 10; //create a loop and add 10 log messages to the queue for(var i = 0; i < MAX; i++){ logsQueue.push("Logs #" + i); } console.log(MAX + " logs were created"); client.quit(); |
Now execute the producer file. You should see the following:
Create a consumer.js file and add the following code:
|
1 2 3 4 5 6 7 8 9 10 11 12 13 14 15 16 17 18 19 20 21 |
var redis = require("redis"); var client = redis.createClient(); var queue = require("./logqueue"); //create a logQueue object and pass the redis client to it var logQueue = new queue.LogQueue("logs", client); function logMessages(){ //retrieve the last message and show it logQueue.pop(function(err, replies){ var queueName = replies[0]; var message = replies[1]; console.log("Consumer got log:" + message); logQueue.size(function(err, size){ console.log("Size:" + size); }); //call the function recursively logMessages(); }); } logMessages(); |
The queue system is ready. Run node producer on one terminal window and node consumer in another. Notice the consumer will continue waiting for new messages, so you can run node producer again to see new log messages.
The above example is not ready for production environment. If anything goes wrong, popped items may be not properly handled. You can use RPOPLPUSH to add the item to an additional queue and check that there are no errors.
Now it’s time to discover hashes. Hashes are great for storing objects. The are optimized to use memory efficiently. Hash is a mapping of a String to a String. Hash can be a ziplist or a hash table. A zilpist is a memory efficient dually linked list. Hash table is not memory-optimized but has a constant-time lookup.
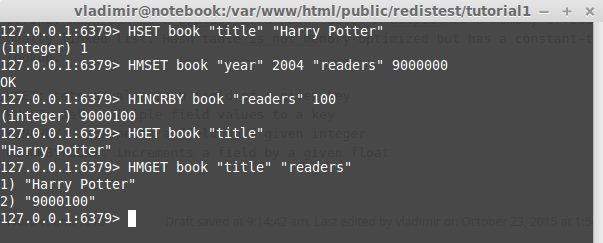
HSET: sets a value to a field of a given key
HMSET: sets multiple field values to a key
HINCRBY: increments a field by a given integer
HINCRBYFLOAT: increments a field by a given float
HGET: retrieves a field from a hash
HMGET: retrieves multiple fields at once
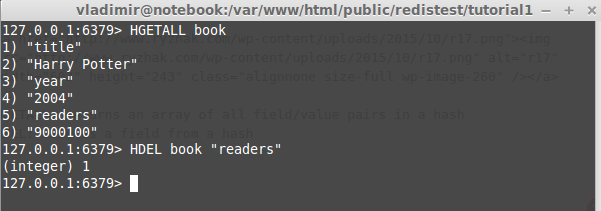
HGETALL: returns an array of all field/value pairs in a hash
HDEL: deletes a field from a hash
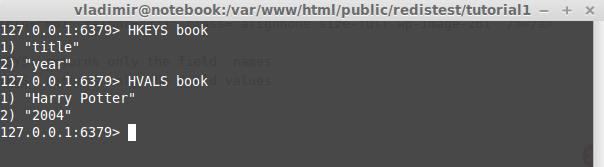
HKEYS: returns only the field names
HVALS: returns only the field values
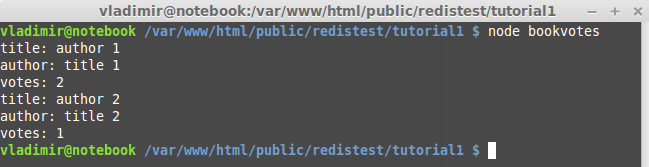
Let’s create an example application. It will be a book voting system with upvote and downvote functions.
Create a bookvotes.js file:
|
1 2 3 4 5 6 7 8 9 10 11 12 13 14 15 16 17 18 19 20 21 22 23 24 25 26 27 28 29 30 31 32 33 34 35 36 37 38 39 40 |
var redis = require("redis"); var client = redis.createClient(); //save a book via HMSET function function saveBook(id, author, title){ client.hmset("book:"+id, "author", author, "title", title, "votes", 0); } //+1 vote for a book function upVote(id){ client.hincrby("book:"+id, "votes", 1); } //-1 vote for a book. Notice the negative number in the HINCRBY function function downVote(id){ client.hincrby("book:"+id, "votes", -1); } //show all the fields by the book ID function showDetails(id){ client.hgetall("book:"+id, function(err, replies){ console.log("title:",replies['title']); console.log("author:",replies['author']); console.log("votes:",replies['votes']); }); } saveBook(1, "title 1", "author 1"); upVote(1); upVote(1); saveBook(2, "title 2", "author 2"); upVote(2); upVote(2); downVote(2); showDetails(1); showDetails(2); client.quit(); |
Now run node bookvotes.
Notice that HGETALL may have a memory issues if a Hash has many fields. In this case, it is better using the HSCAN function. It returns a cursor and the Hash fields with their values in chunks. You need to execute this function until the returned cursor is 0.
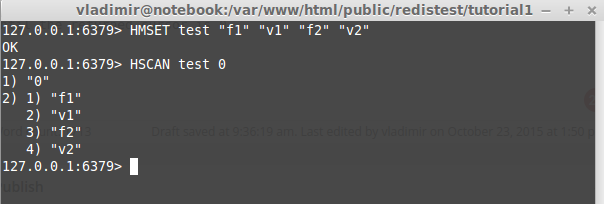
The above example may return something like
|
1 2 3 4 5 6 7 8 9 10 11 12 |
1) "17" 2) 1) "key:12" 2) "key:8" 3) "key:4" 4) "key:14" 5) "key:16" 6) "key:17" 7) "key:15" 8) "key:10" 9) "key:3" 10) "key:7" 11) "key:1" |
In this case to retrieve the next chunk of data we need to run HSCAN test 17.
In this tutorial, we installed Redis and tried out several data types. That’s all for today 🙂